
Pax8 Partner Authorization via OAuth2
This guide is recommended for 3rd party vendors & applications that are getting Pax8 partner authorization
This guide is intended for third-party application developers who want to integrate with Pax8's public APIs on behalf of Pax8 partners. If you're a Pax8 partner looking to use third-party applications, please review this guide.
What is Delegated Authorization?
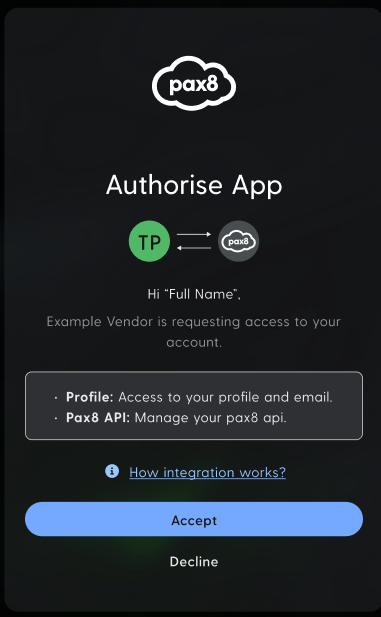
Delegated Authorization is the process of obtaining a Pax8 Partner's consent to call Pax8's Public APIs on their behalf. Before you can access any partner data, the partner must explicitly provide consent through the OAuth2 Authorization Code Grant flow.
When a partner authorizes your application, they will see a consent screen similar to this:
Getting Started
1. Initial Setup
- Contact Pax8: Send an email to
[email protected]to discuss your integration use case. - Receive Credentials: Pax8 will review your use case and provide:
- Sandbox credentials
- Vendor Portal access
- API keys
- Client ID and Client Secret for OAuth
2. Implementation Overview
Pax8 follows the standard OAuth2 Authorization Code flow with a few specific requirements. If you're familiar with OAuth2, you can likely adapt your existing implementation with minimal changes. The main Pax8-specific requirement is the mandatory audience parameter.
OAuth2 Flow Implementation
Step 1: Create an Integration Page
Build a page in your application where Pax8 partners can:
- Learn about your Pax8 integration
- Initiate the authorization process via an "Integrate with Pax8" button
Step 2: Request Authorization
We recommend using Auth0 libraries for your preferred programming language: API docs
The following is a simplified example showing how to go about this:
When a partner clicks your integration button, redirect them to the Pax8 authorization endpoint:
Authorization Endpoint
https://login.pax8.com/authorizeRequired Parameters
| Parameter | Value | Description |
|---|---|---|
response_type | code | Specifies that you're using the authorization code flow |
client_id | <your clientId> | The client ID provided by Pax8 |
scope | Manage:Pax8Data | The permissions you're requesting (see Supported Scopes section) |
redirect_uri | <your redirect uri> | The URL where Pax8 will send the authorization code (must be pre-registered with Pax8) |
audience | https://api.pax8.com | Required - Specifies that you're requesting access to the Pax8 API |
Security Parameters
| Parameter | Description |
|---|---|
state | A random value you generate to prevent CSRF attacks. Store this value in your session and verify it when Pax8 redirects back to your application. |
nonce | A random value used to prevent replay attacks. This value will be included in the ID token if you request the openid scope. |
Example Authorization URL
https://login.pax8.com/authorize?
response_type=code&
client_id=<your clientId>&
scope=Manage:Pax8Data&
state=<your state>&
redirect_uri=<your redirect uri>&
nonce=<your nonce>&
audience=https://api.pax8.com
Step 3: Handle the Authorization Response
After authorization, Pax8 redirects to your redirect_uri with an authorization code:
https://<your-redirect-url>?code=<authorization code>- Verify that the
stateparameter matches the value you sent - Extract the
codeparameter from the URL
Step 4: Exchange the Code for Tokens
Make a POST request to exchange the authorization code for tokens:
Endpoint:
POST https://login.pax8.com/oauth/tokenHeaders:
Content-Type: application/jsonRequest Body:
{
  "grant_type": "authorization_code",
  "code": "<authorization code from Step 3>",
  "client_id": "<your clientId>",
  "client_secret": "<your clientSecret>",
  "redirect_uri": "<your redirect uri>"
}
Response:
{
  "access_token": "<access_token>",
  "id_token": "<id_token>",         // Only included if you requested the 'openid' scope
  "refresh_token": "<refresh_token>", // Only included if you requested the 'offline_access' scope
  "scope": "<granted scopes>",
  "expires_in": 86400,              // Token validity in seconds (24 hours)
  "token_type": "Bearer"
}
Token Management
Token Lifetimes
- Access Token: Valid for 24 hours (86400 seconds)
- Refresh Token:
- Absolute lifetime: 1 year (31,557,600 seconds)
- Even with refreshing a token once this time has passed you will be required to have your user re-authenticate. Be sure to have your app configured to alert your user or have them re-submit the authorization page you created in the Oauth Flow
- Inactivity lifetime: 15 days (1,296,000 seconds)
- Each use of the refresh token:
- Issues a new refresh token
- Invalidates the previous refresh token
- Resets the inactivity timer
- For security purposes, refresh tokens are rotated - only the most recently issued refresh token is valid. So for every access request a new refresh token will be provided. Save this for future use.
- Absolute lifetime: 1 year (31,557,600 seconds)
Refreshing Access Tokens
When an access token expires and if you requested the offline_access scope and received a refresh token, you can use it to obtain a new access token when the current one expires:
Endpoint:
POST https://login.pax8.com/oauth/tokenRequest Body:
{
  "grant_type": "refresh_token",
  "refresh_token": "<refresh_token>",
  "client_id": "<your clientId>",
  "client_secret": "<your clientSecret>"
}
Important Notes:
- The refresh token you receive in the response replaces your previous refresh token
- Your previous refresh token becomes invalid immediately
- Always update your stored refresh token with the new one received in the response
- If you attempt to use an old refresh token, the request will fail and you'll need to re-authorize
Step 5 API Usage
Include the access token in the Authorization header when calling Pax8 APIs:
Authorization: Bearer <access_token>For detailed API documentation, see the Pax8 API Reference.
Supported Scopes
| Scope | Description |
|---|---|
Manage:Pax8Data | Access to partner's Pax8 data (orders, subscriptions, contacts, products & invoices). Currently, this is the only data scope available. More granular scopes will be available in the future. |
email | Access to the user's email address |
profile | Access to basic profile information |
openid | When requested, the response will include an ID token with the user's identity |
offline_access | When requested, the response will include a refresh token |
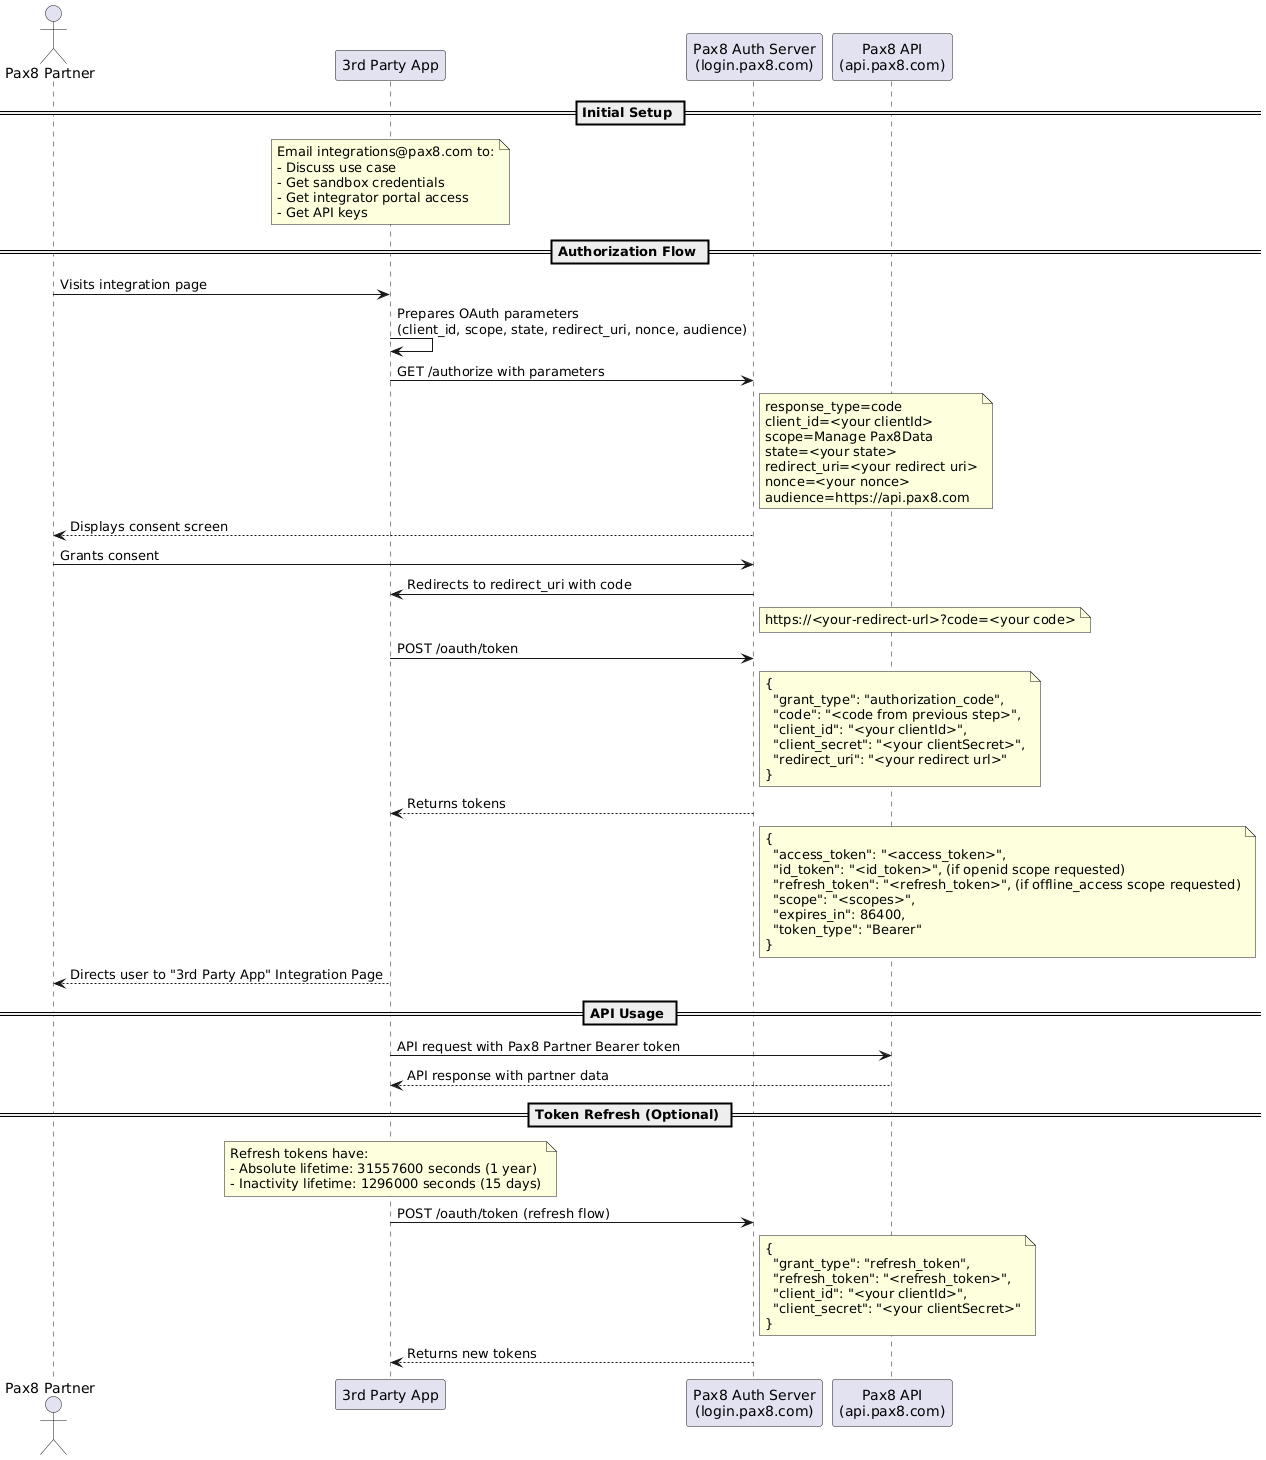
Sequence Diagram
Example Implementation
Python Example
This example demonstrates how to implement the OAuth2 authorization flow for Pax8 APIs using the Auth0 Python SDK.
Prerequisites
Install the required packages:
pip install auth0-python requestsSimple OAuth2 Client
import time
import requests
from auth0.authentication import GetToken
from urllib.parse import urlencode

class Pax8AuthClient:
    # Pax8 OAuth2 configuration
    DOMAIN = "login.pax8.com"
    CLIENT_ID = "YOUR_CLIENT_ID"
    CLIENT_SECRET = "YOUR_CLIENT_SECRET"
    REDIRECT_URI = "https://your-app.com/callback"
    AUDIENCE = "https://api.pax8.com"
    SCOPE = "Manage:Pax8Data offline_access"

    def __init__(self):
        self.access_token = None
        self.refresh_token = None
        self.expires_at = 0
        self.auth0_client = GetToken(self.DOMAIN)

    def get_authorization_url(self):
        """Generate the authorization URL to redirect the user to"""
        # Build the authorization URL with all required parameters
        # The Auth0 SDK will handle state parameter automatically
        params = {
            'response_type': 'code',
            'client_id': self.CLIENT_ID,
            'redirect_uri': self.REDIRECT_URI,
            'scope': self.SCOPE,
            'audience': self.AUDIENCE
        }

        query_string = urlencode(params)
        authorization_url = f'https://{self.DOMAIN}/authorize?{query_string}'

        return authorization_url

    def exchange_code(self, code):
        """Exchange the authorization code for tokens"""
        # Exchange the code for tokens using Auth0 SDK
        token_data = self.auth0_client.authorization_code(
            client_id=self.CLIENT_ID,
            client_secret=self.CLIENT_SECRET,
            code=code,
            redirect_uri=self.REDIRECT_URI
        )

        self.access_token = token_data.get('access_token')
        self.refresh_token = token_data.get('refresh_token')
        self.expires_at = time.time() + token_data.get('expires_in', 86400)

        return token_data

    def refresh_token_if_needed(self):
        """Refresh the access token if it's expired"""
        if not self.refresh_token:
            raise ValueError("No refresh token available")

        if time.time() >= self.expires_at:
            token_data = self.auth0_client.refresh_token(
                client_id=self.CLIENT_ID,
                client_secret=self.CLIENT_SECRET,
                refresh_token=self.refresh_token
            )

            self.access_token = token_data.get('access_token')
            self.expires_at = time.time() + token_data.get('expires_in', 86400)

            # The refresh token might be rotated, so update it if a new one is provided
            if 'refresh_token' in token_data:
                self.refresh_token = token_data.get('refresh_token')

    def call_api(self, endpoint):
        """Make a request to the Pax8 API (placeholder)"""
        self.refresh_token_if_needed()

        # In a real implementation, you would make an actual API call here
        # This is just a placeholder to show how to use the access token
        print(f"Calling API endpoint: {endpoint}")
        print(f"Using access token: {self.access_token[:10]}...")

        # Example of how you would make the actual API call:
        # headers = {"Authorization": f"Bearer {self.access_token}"}
        # response = requests.get(f"https://api.pax8.com{endpoint}", headers=headers)
        # return response.json()

        return {"message": "This is a placeholder for the API response"}
Minimal Usage Example
from flask import Flask, request, redirect, jsonify

app = Flask(__name__)
app.secret_key = "your-secret-key"  # Replace with a real secret key

### Create an instance of the Pax8AuthClient
auth_client = Pax8AuthClient()

@app.route("/login")
def login():
    """Step 1: Redirect user to Pax8 authorization page"""
    auth_url = auth_client.get_authorization_url()
    return redirect(auth_url)

@app.route("/callback")
def callback():
    """Step 2: Handle the callback and exchange code for tokens"""
    code = request.args.get("code")

    try:
        auth_client.exchange_code(code)
        return "Authorization successful! You can now use the access token to call Pax8 APIs."
    except Exception as e:
        return f"Error: {str(e)}", 400

@app.route("/api-example")
def api_example():
    """Example of calling an API with the access token"""
    try:
        # This is just a placeholder - replace with your actual API endpoint
        result = auth_client.call_api("/your-api-endpoint")
        return jsonify(result)
    except Exception as e:
        return f"Error: {str(e)}", 400

if __name__ == "__main__":
    app.run(debug=True)
Usage Notes
- Replace
YOUR_CLIENT_IDandYOUR_CLIENT_SECRETwith the credentials provided by Pax8. - Update
REDIRECT_URIto match the callback URL registered with Pax8. - This example uses Flask for simplicity, but the
Pax8AuthClientclass can be used with any Python web framework. - The
call_apimethod is a placeholder - replace it with your actual API calls. - The Auth0 Python SDK handles security features like state parameter management automatically.
Testing Notes
- Important: Your Vendor Portal account cannot be used to test the delegation flow. Only Pax8 Partner accounts will work.
- If you are logged into the Vendor Portal (https://integrations.pax8.com), you must test the login flow in a new browser or incognito window to avoid granting consent with your Integrator account instead of a Partner account.
Security Considerations
- Always use HTTPS for all communication.
- Store client secrets securely and never expose them in client-side code.
- In production, store tokens securely, not in the session as shown in this example.
- Use a strong, randomly generated secret key for your Flask application.
Support
If you encounter issues during implementation, please contact [email protected] for assistance.
Updated 4 months ago